2. Using the inoQulate Solution
2.1. TL;DR
The inoQulate solution operates on the Azure File Share. See Access the Azure File Share from the Azure Portal for instructions to access the File Share.
Drop the PDFs to inoQulate in the data/toInoQulate folder of the
Azure File Share. Retrieve the inoQulated PDFs from data/inoQulated.
Use Adobe Reader and the inoQulate PDF Verifier application provided in the File Share to verify that your PDF documents are protected.
2.2. Working Directory
2.2.1. Files and reports
The inoQulate solution works with the data folder of the Azure File Share.
The directory structure of data containing some sample files is as follows:
data
├── done
│   └── sample.pdf
├── error
├── inoQulated
│   └── sample.pdf
├── report
│   └── 2023-07-11T05.12.03+0000.txt
└── toInoQulate
The
inoQulatedfolder contains the inoQulated copies of the original files.The original pre-inoQulation copy of the files are moved to
doneon successful completion.The
errorfolder contains files that failed to be inoQulated. Investigate the job logs for the reason for failure.The
reportfolder contains a summary for every job run of the service. Each summary details a list of files that were detected, successfully inoQulated, and failed inoQulation.For the
toInoQulatefolder,All PDF files in this folder will be picked up for inoQulation.
Files not of PDF format will be moved to
error.Files not of PDF format and starts with a period
.will be ignored.
2.2.2. SPP Proofs
The SPP Proofs are located in the proofs directory in the Azure File Share.
They are cryptographically generated for every inoQulated PDF.
2.2.3. Configuration Files and generated certificates
The configuration files and generated certificates are located in the config
directory.
Here are the files of note.
File Name |
Use |
|---|---|
inoQulate.PDF.Verifier_1.0.0_x64_en-US.msi |
inoQulate PDF Verifier installer for Windows. |
log.txt |
The terminal output when running |
ManagementCA.crt |
The root certificate authority certificate for the client certificate to access the webpages and the TLS certificates for EJBCA and Signserver. |
sample.pdf |
A sample PDF document. |
superadmin.p12 |
The client certificate used as authentication to the EJBCA and Signserver Admin Web Pages. See How do I access the admin webpages of EJBCA and Signserver?. |
setup.sh |
The script to do an initial setup of the solution. |
scripts/testrun.sh |
The script to do a test run to make sure the solution is working correctly. |
2.3. Scheduled Runs
The inoQulate solution works by polling PDF files from the data/toInoQulate
folder periodically. Hence, you should copy all PDF files you want to inoQulate
into the data/toInoQulate folder of this Azure File Share.
Clear out the done, error and inoQulated directories when the runs
are complete. The service is programmed to never overwrite any files, so clashes
in file names will result in an error.
Kubernetes CronJobs run jobs according to the cron schedule configured at Kubernetes Cluster.
2.4. Create a Pipeline for your documents
You need to drop your documents to inoQulate into the given Azure File Share.
For testing purposes, you can consider manually uploading documents into the
folder directly. You can use the command kubectl create job <job name>
--from=cronjob/servicerunner to manually trigger a run.
A more permanent solution depends on how your documents can be accessed in your company’s document store. Examples include:
Using Azure Data Factory to move files
Running a script from the document host system to upload files into the File Share
Mounting the File Share in an ephemeral system that downloads files from your document store
2.5. Test run the service
This section describes the steps to do a test run of the service. A copy of
sample.pdf will be inoQulated, along with any other PDFs you place in the
toInoQulate directory.
Note that the setup process script ./setup.sh does this test run as the last
step.
Note
If you have another sample.pdf in any of the directories in data,
they will be deleted.
Connect your terminal to the File Share if you have not done so.
From the
configdirectory, enter the command below../script/testrun.sh
After about a minute, the command completes. The test run is successfully when you see the message:
Test run successful!
The
datafolder should look similar to this:data ├── done │ └── sample.pdf ├── error ├── inoQulated │ └── sample.pdf ├── report │ └── 2023-07-11T05.12.03+0000.txt └── toInoQulate
Your inoQulate service is set up and working.
2.6. Verifying the inoQulation
The recommended way to check that your document is inoQulated is done in two steps:
Open it in Adobe Acrobat Reader. The signature(s) of the document should be reported as valid.
Verify it with the provided inoQulate PDF Verifier application. The document should be reported as verified.
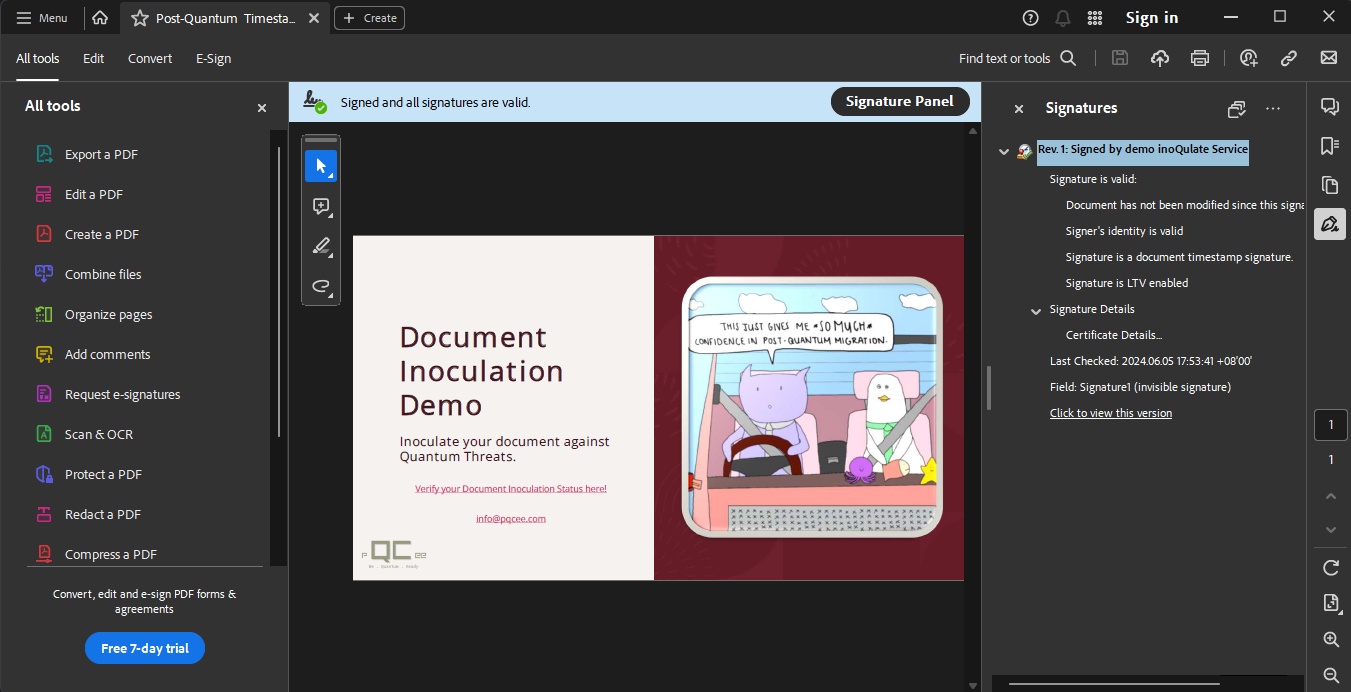
2.6.1. Adobe Acrobat Reader
Note that you have to trust the Certificate Authority (CA) for every machine that you want to open and verify the signature of the document in.
Open the inoQulated document in Adobe Acrobat Reader.
Click the Signature Panel button.
Expand the signature tied to the inoQulate service, usually Rev. 1. Expand Signature Details and click Certificate Details.
In the left panel of the Certificate Viewer, click the CA that you created.
Click the Trust tab.
Click Add to Trusted Certificates….
Click Ok three times.
Right-click the signature and click Validate Signature.
The panel should read Signed and all signatures are valid.
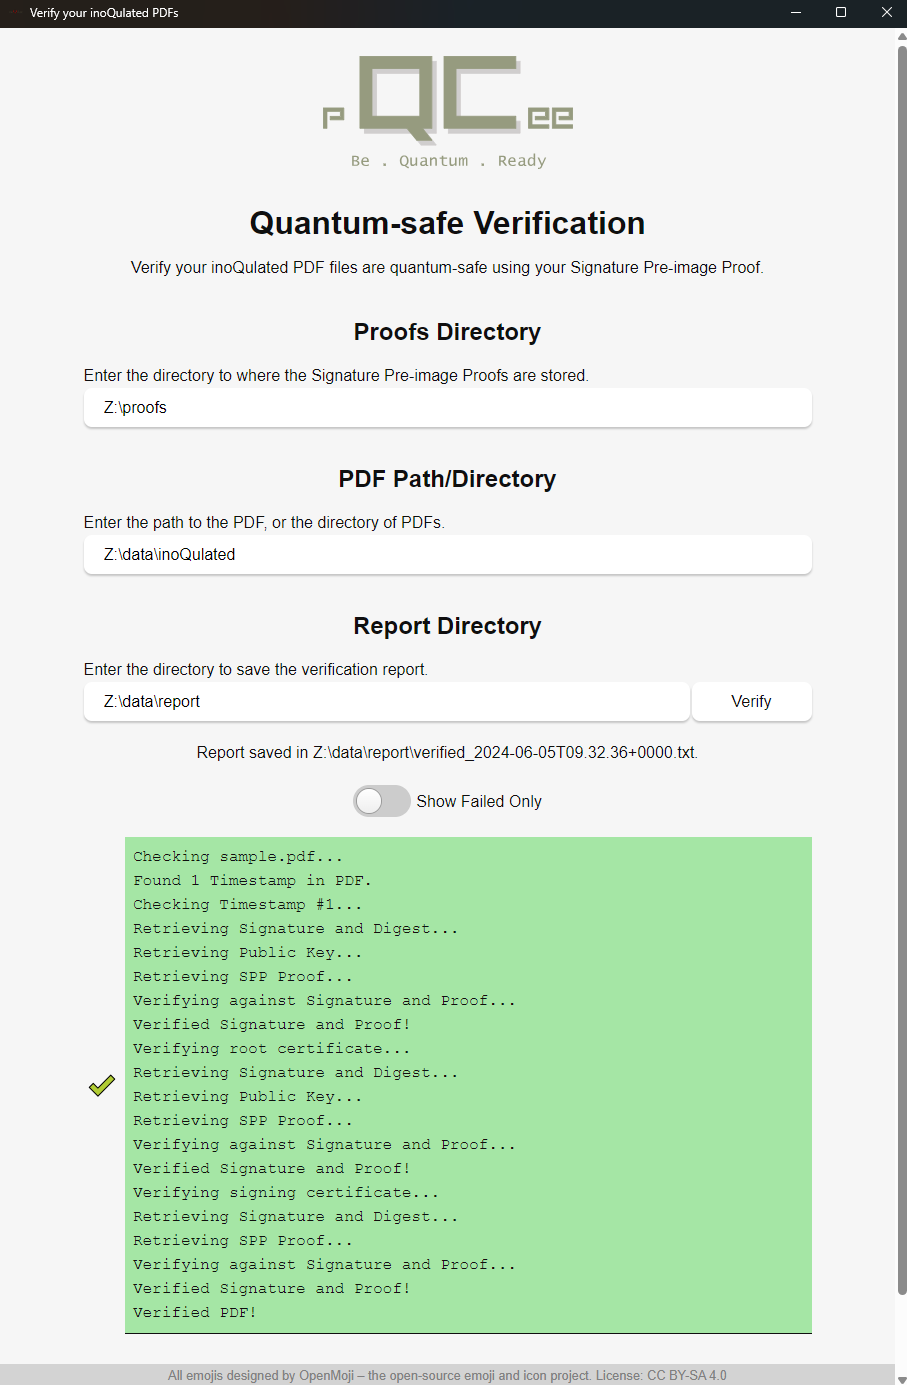
2.6.2. inoQulate PDF Verifier
When you set up the inoQulate solution, the inoQulate PDF Verifier for Windows is provided. See the Install the inoQulate PDF Verifier step on how to install the application.
The inoQulated files to verify and the associated proof files must also be
available on your Windows computer. The simplest method is to connect the
File Share to the Z:\ drive.
Double-click the
inoQulate PDF Verifierapplication on your desktop.If directories are different from the installation and setup, edit the fields as necessary.
The Proofs Directory is where the Signature Pre-Image Proofs are stored.
The PDF Path/Directory is where the PDF documents you want to verify are stored. This field accepts both the path to an individual file, or a directory of PDF documents, in which all PDF documents will be verified.
The Report Directory is where the generated verification report will be stored. It summarises the documents that were verified inoQulated or otherwise.
Click Verify.
The results of the verification are displayed in the application, and a report is generated and saved to the Report Directory.
Ensure that the documents are successfully verified in the results displayed in the application, and in the generated report.