1. Getting started with AStablish on Microsoft Excel
This section covers all you need to know for AStablish before you start using AStablish.
1.1. Before you start
Ensure that you have access to the latest version of Excel (at least 2016 or later) and an active Microsoft 365 subscription.
Ensure that your Microsoft account is a Work or School account.
Ensure you are using either Excel on Desktop or for Excel on Web, the browser should be new Edge.
If you are using Excel on Web, AStablish does not support the following browsers:
Internet Explorer
Microsoft Edge Legacy
For example, on Internet Explorer 11, running AStablish will show a message:
This add-in will not run in your version of Office. Please upgrade either to perpetual Office 2021 (or later) or to a Microsoft 365 account.
AStablish does not run on the following instances:
Excel for Android
Excel for iPad
Excel for Mac
However, if you are using a Mac device, you may run AStablish on Excel on Web.
1.2. AStablish’s features
- One of AStablish’s features is checking whether a wallet address has appeared in any blacklist. The current blacklist AStablish checks against is:
- US Treasury OFAC (Office of Foreign Assets Control). All wallet addresses for the blockchains that are in the OFAC Blacklist are supported for the blacklist check. These include:
Arbitrum (ARB)
Bitcoin Cash (BCH)
BNB Smart Chain (BSC)
Bitcoin Satoshi Vision (BSV)
Bitcoin Gold (BTG)
Dash (DASH)
Ethereum Classic (ETC)
Ethereum (ETH)
Litecoin (LTC)
Tron (TRX)
USD Coin (USDC)
Tether (USDT)
Monero (XMR)
Ripple (XRP)
Verge (XVG)
Zcash (ZEC)
- The current list of blockchains that AStablish supports is:
Bitcoin
Ethereum
BNB
Polygon
Arbitrum One
Dogecoin
Cardano
Sei EVM (Testnet)
Solana
Litecoin
Polkadot
Bitcoin Cash
Avalanche
Ton
Optimism
Dash
Gnosis
Zcash
Handshake
Polygon zkEVM
Fantom
- The current list of wallet address formats AStablish supports for Bitcoin is:
Legacy P2PKH, wallet address which starts with “1”, for example: 1Nk6Bp97FJSRRwkEa6zJJuFWSXrUDs8w1v
P2SH, wallet address which starts with “3”, for example: 3GBKyMHBBnxLBJYzCReDsaLkohd17o1KWj
Segwit P2WSH, wallet address which starts with “bc1”, followed by a Base32-encoded witness version (0) and a Base32-encoded script hash, for example: bc1q9p60rky2tcnscuw20k4vq9z72lpq5v4f7j
Segwit P2WPKH, wallet address which starts with “bc1”, followed by a Base32-encoded witness version (0) and a Base32-encoded public key hash, for example: bc1q0pl5p4xaq8jwg2k2l8er2lt02wvnnuyjgu7vz6j8c
P2TR, wallet address which starts with “bc1p”, for example: bc1pmzfrwwndsqmk5yh69yjr5lfgfg4ev8c0tsc06e
- The current wallet address formats AStablish supports for Ethereum:
Starts with “0x” and has a total of 40 Base16 characters, for example: 0x683ca400dd0Dc32ff395D93ec12ead409FeCbC84
Do note that for AStablish’s features:
For Check against blacklist, only wallet addresses are sent to pQCee’s server to check against the blacklist.
For Transaction Details and Wallet Blockchains, only wallet addresses are sent to third-parties.
1.3.1. Installation for Excel on Desktop
Open Desktop Excel and load any Excel Workbook.
- Install the Add-in:
Click File in the top-left corner. A Task Pane will show up on the left.
Click Get Add-ins on the left. An Office Add-ins Dialog box will appear.
Under STORE, search for AStablish, an AStablish icon will appear.
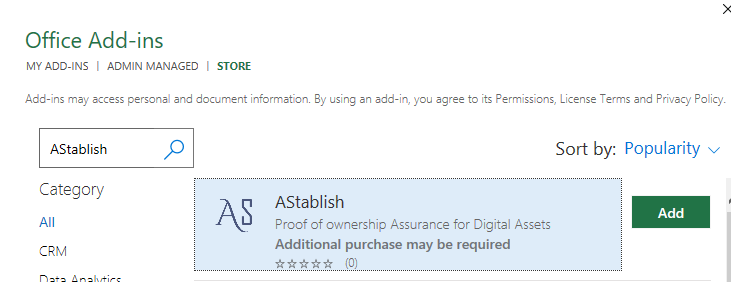
Click on the icon and you may view additional information regarding AStablish.
Click the Add button if you wish to use the AStablish solution.
Click Continue.
To activate AStablish for Office Add-in, click AStablish icon in the Excel Home Ribbon. An AStablish Task Pane will appear on the right.
Congratulations! You have installed AStablish for Office Add-in.
1.3.2. Installation for Excel on Web
Open Desktop Excel and load any Excel Workbook.
- Install the Add-in:
Click File in the top-left corner. A Task Pane will show up on the left.
Click More Add-ins.
Click Get Add-ins on the left. An Office Add-ins Dialog box will appear.
Under STORE, search for AStablish, an AStablish icon will appear.
Click on the icon and you may view additional information regarding AStablish.
Click the Add button if you wish to use the AStablish solution.
Click Continue.
To activate AStablish for Office Add-in, click AStablish icon in the Excel Home Ribbon. An AStablish Task Pane will appear on the right.
Congratulations! You have installed AStablish for Office Add-in.
1.4.1. Uninstallation for Excel on Desktop
Click File in the top-left corner. A Task Pane will show up on the left.
Click Options. An Excel Options Dialog box will appear.
Click Trust Center on the left, and click Trust Center Settings button. The Trust Center Dialog box will appear.
Click Trusted Add-in Catalogs on the left. The Dialog box contents updates to show Trusted Web Add-in Catalogs on the right.
Check the Next time Office starts, clear all previously-started web add-ins cache option, and click the OK button. A notification will pop up to inform the User that this change will be applied when Desktop Excel is restarted.
Quit Desktop Excel. The Add-ins will be removed when you start Desktop Excel subsequently.
1.4.2. Uninstallation for Excel on Web
Open Desktop Excel and load any Excel Workbook.
- Uninstall the Add-in:
Click File in the top-left corner. A Task Pane will show up on the left.
Click Get Add-ins.
Click Manage my Add-ins, you will see the AStablish icon in the list of add-ins you have on Excel.
Right click on the AStablish icon and select remove.